Senior Design Project: Design Process Page
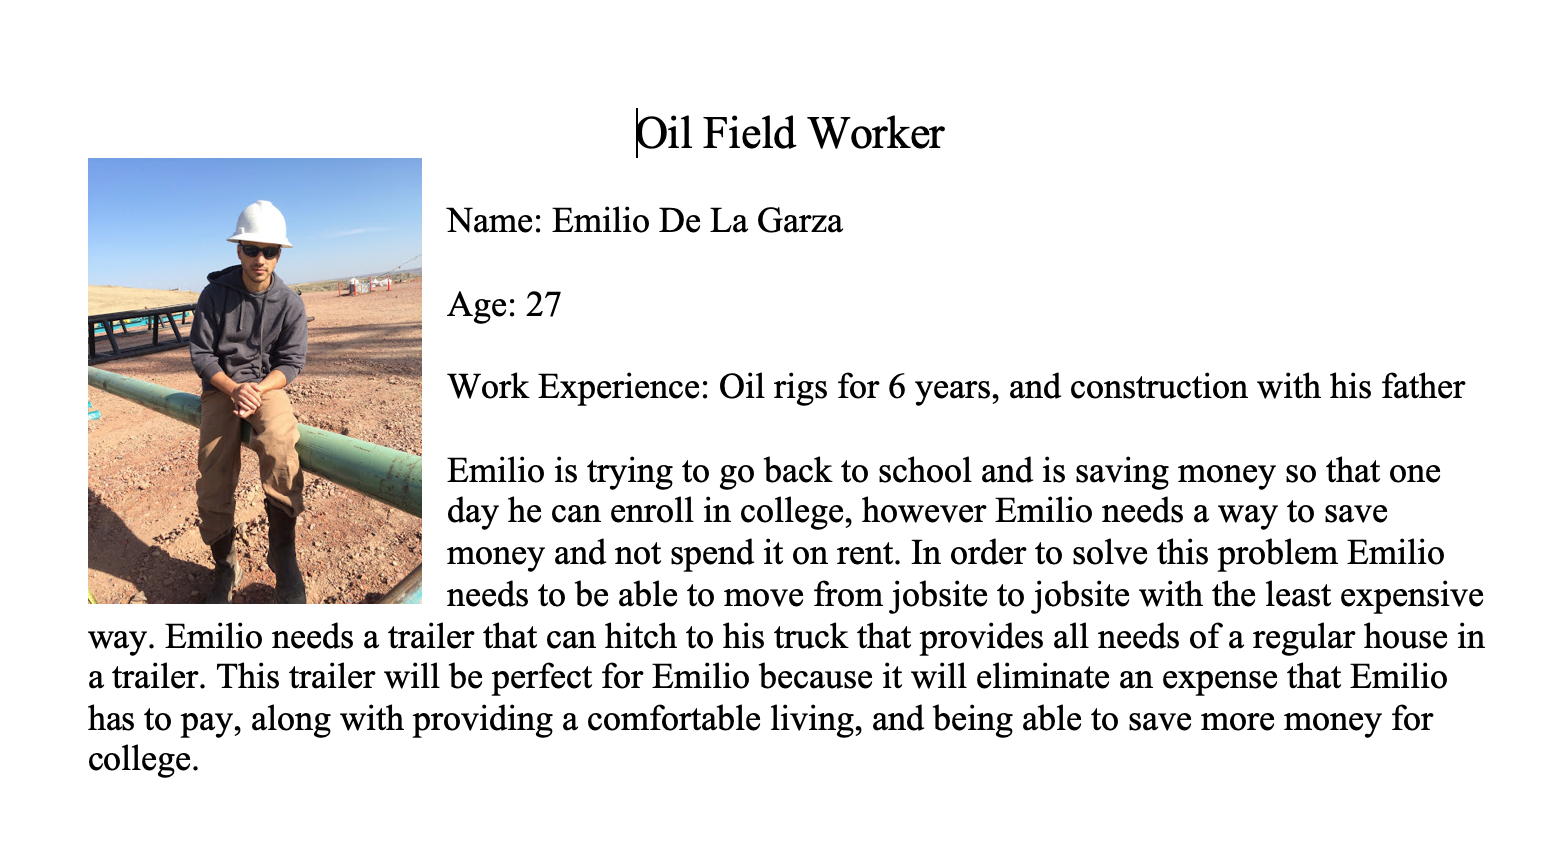
Team 7: Tiny House for Oil Field Workers
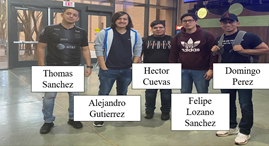
| Students (L-R) |
|
| Faculty Advisor |
|
| Instructor(s) |
|
Contents
Design Process
During Senior Design we followed a design process, which consists of multiple steps that would guide us from the problem we are trying to solve to testing the system incorporated in our project. In other words, the design processes was the process the team took throughout the year to be able to complete our senior design project from the problem we are trying to solve to testing our final product. This process helps the team provided a steady and fluent working environment and provided a guideline when comparing whether we were on schedule or behind by following it.
Problem ID
The problem ID is the issue we are trying to solve with the creation of our product, for this step we had to research products out in the market and determine their flaws. Documenting each products' flaws, we had to come up with ideas to make our product solve the flaws and be better than the competition. For our project, the problem ID consist of finding an affordable option for many traveling workers instead of having to spend over $50,000 on a RV or mobile home. The manufacturing of our product will provide a cheaper solution than the ones out in the market, we also want the design to be eco-friendly.
Problem Formulation
Problem formulation consists of all the background research toward the construction of our product. This step consists of comparing the products out in the market to the project we are trying to manufacture. In problem formulation we had to find the criteria that made the products in the market not so attractive to the customers and then come up with alternatives to fix those flaws. In this step is where laws toward tiny homes were looked up and we determined more ways to make our product more appealing to consumers. The last step will be to provide the design specifications toward our design that will show the items tha the design would need to incorporate.
Conceptual Design
Conceptual Design consist of the 3D design and items that will be integrated into our house. This step is where most of the planning and engineering took place. Concept variants were made for each section of our tiny house, each variant had different options of object that could meet the same need. The final concept variants were then selected through different elimination methods, to find the best option available. Functions and subfunctions were also generated to show all the things that will happen inside the tiny house and determining on how our product meet them.
Embodiment Design
Embodiment Design is the step where the hands on work starts. This step consists of the construction of our project and putting our conceptual design into a physical product. All the work done over a semester and a half is now put to the test by constructing the product the team has spent months designing and doing research on. This step will consist of putting our product together to be able to demonstrate that all the work we did as a team was done correctly. The embodiment Design demonstrates all our calculations and engineering design that went into our design and demonstrates the quality and design the team had set out to make.
Testing and Validation
Testing and Validation is the step were our final product is almost done, however we have to make that every system or design in our project works. For our project, we had multiple systems that we had to test to be able to make sure our product was fully functional. The electrical system and the water system were the two main tests we had to conduct multiple tests on. The extensive test was to ensure that both are systems were running 100 % percent with no leaks or that the electricity was running correctly throughout out house. We also had to test the weight distribution to be able determine that the weight was correctly distributed and will not cause any falling in the future. The testing step is the most critical of them all, because if not done correctly it may injure a person or even worse cause a death, due to an electrical failure or a weight failure.
Problem ID
The objective of the Problem ID stage is to clearly identify the problem we are trying to solve when designing our project. These will help set the first step to what our team will try to accomplish when manufacturing our final project. The problem ID will help us determine who are targeted consumers will be and how our product could be better suitable to them than the ones currently in the market. The team first must determine the solutions currently out in the market for the problem we are trying to solve. In the problem ID a brief estimate of what our product could cost is calculated and then compared with similar products already in the market.
Problem Opportunity Gaps (POG)
Initially the team generated multiple POG’s which are the following:
- Traveling workers can spend months at a time away from home and need a place to stay during those months
- The cost of renting an apartment or a hotel room can significantly add up over time and take away from the earnings of traveling workers.
- Traveling workers can purchase one of the existing solutions such as an RV, camper, or a tiny home from a manufacture, but these solutions also carry a heavy price tag.
- Public interest in the tiny home movement has increased in recent years as more and more people have been building their own tiny homes.
- Climate change is an ongoing issue and one of the ways to combat it is by reducing one’s carbon footprint. Due to the compact nature of the tiny home, there is less water and electricity consumption and less waste which are great ways to reduce carbon footprint.
Value Opportunity Chart
For selected POG’s we created VOA charts which is the following:
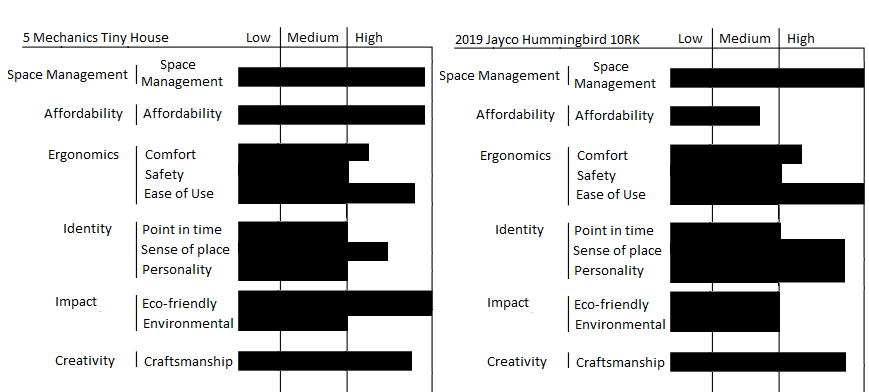
The VOA chart was the first background research we did toward our project. It consisted of comparing our project to products out in the market. The VOA above shows the comparing of our tiny house to Jayco's RV, as a team decision we had to come up with 6 criteria to be able to compare both products. The criteria we came up with were space management, affordability, ergonomics, identity, impact, and creativity. For some of the criteria, sub-criteria were created to hone in on key aspects of the established criteria. From these we used a grading chart to determine how each one was satisfied by each product. The products were similar up to when it came to ergonomics, identity, and creativity, we knew the Jayco product was a lot more attractive to the consumers due to the luxury and quality that it showed; however, our product will have similar quality but at a cheaper price. The main focus that our team was looking for is to provide an environmentally friendly product to the market
Final Problem Statement
We selected a final problem; the problem was to find an alternative affordable and environment friendly option for many traveling workers across the world. While looking at our competitors we saw that the products out in the market were all mostly over $45,000, so we decided that we wanted to design a similar product but at half the price. This will help many of these customers by not having to spend a large quantity of money on a RV, by providing a cheaper option with a little less luxury.
Problem Formulation
The objective of the Problem Formulation stage is to take the value opportunity from identifying the problem and formulating a clear understanding of what it is that needs to be solved. The way that the team was able to get that understanding was through researching topic. Background research was done to get context for the problem, competitive products were investigated to see what the current solutions to the problem are and get an idea of where they excel and areas that we see can be improved. User research is conducted to understand what the customer is looking for in a product. This research is then taken, and design specs are created to provide a framework to design the product around.
Background Research
To better understand the context of the problem to solve, we conducted Background Research on various topics. To be able to make our project better than the ones out in the market, we had to do an extended research on competitive products, laws toward tiny houses, and look into designs which then we could improve on to make it a better product.
Competitive Products
To avoid “reinventing the wheel”, we looked at some existing solutions and listed them in a table and put them into categories in order of similarity from very similar to miniscule similarity. One product from each category that is in bold will be highlighted showing details about the competitive product with the advantages and disadvantages of the product.
| Very Similar | Somewhat Similar | Miniscule Similarity |
|---|---|---|
| Jayco Blue Hummingbird | Cabins | Motel rooms |
| Arctic Fox 1150 truck camper | Storage Unit house | Cruise Ship Rooms |
| 2020 Northwood Arctic camper | Truck Camper | Capsule Hotels |
| 2019 Taxa outdoors cricket truck | Cabela's Ultimate Alaknack 12-ft. X 12-ft. Tent |
Apartment |
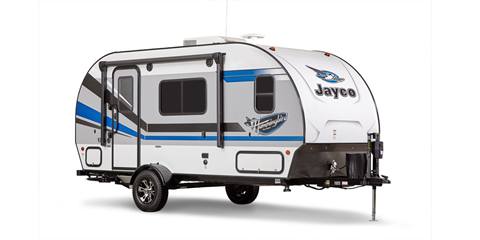
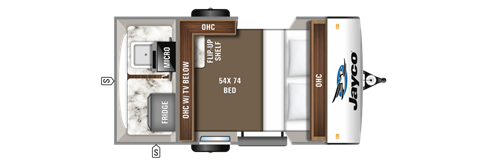
The 2019 Jayco Hummingbird 10RK is one of the products that were categorized as very similar to the tiny house project. This trailer has a small design and has mostly everything that a customer would need to travel.
Description
- Small (RV)Ranging from 13’to 20’
- $10,495
- 1545 to3015 lbs.
- 1 door, 3-4 windows
- May include small kitchen/bathroom and bedroom/living room
The two images above show the exterior of the Hummingbird and below it is an above view showing what the interior looks like. The strengths of this product is its' luxury factor, it has a modern looking design, is a compact design that can easily be hitched to go, the design is also able to incorporate facilities that a person would need such as a kitchen area and bed area. The weakness of this product is that it may be a little too cramped, there does not appear to be much moving space with the bed taking up most of the floor area. Another weakness is that a shower/restroom facility is not part of the design which would be an inconvenience for an oil field worker after a long day working out in the field.
Truck campers were categorized as being somewhat similar to the project and that is the next competitive product highlighted. The specific model of camper that was looked at was the Lance 650 Truck Camper from Lance Truck Campers.
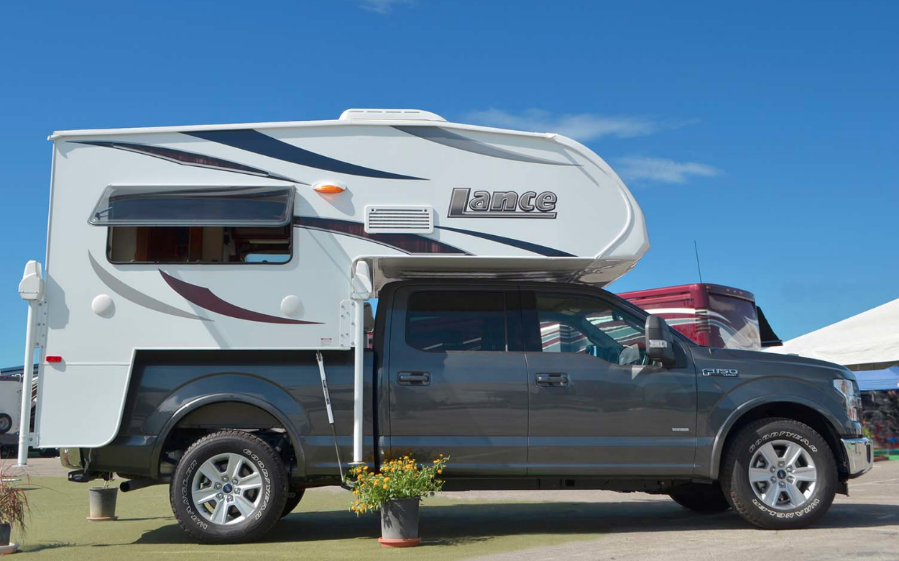
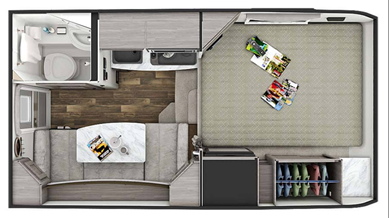
Description
- Truck camper
- Starts at $49,000 base price w/customization
- Around 1700 lbs
- Installed to the back of the truck
- Includes small bathroom w/ basic shower, sleeping space, and cooking space with living room area
An above view of what the interior of the camper looks like is shown above with an exterior view of the product. This camper does not need to be hitched to the truck, instead it is to be bolted onto the truck. Similar to the Hummingbird, the strengths of the camper are the luxury aspect of the product as well as being able to get necessities into one compact space. The places where this product beats the Hummingbird is that it appears a little more spacious and a little less closed in even including a sofa, also there is an inclusion of a basic restroom. Another thing about this product is that it is customizable so the customer can tailor it to their liking. One of the weaknesses of this product is how it involves sacrificing the bed of the truck in order to use the product. Another issue is that it has a heavy price tag attached to it with a base price of $49,000.
The last product to highlight is the Capsule hotel. Unlike the previous two products shows, this is solution is a service.
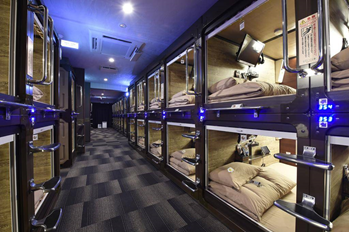
Description
- Very small space, is sizable for 1 human
- 1 bed and small TV
- Building contains hundreds - thousands of capsules
- Mostly found in International big cities like Tokyo, Japan
These hotels are mostly found in Japan with a few appearing in international cities. This product provides a sleeping area for customers. One advantage is that the cost is around $18-$36 for a night making an inexpensive option. The disadvantages of this are that there is little privacy because everyone sleeps in their own capsules all located in one space. Another disadvantage is the open design of the capsule could lead to noise issues.
User Research
Understanding the user wants and needs is key for the design of a valuable product, we applied a variety of User Research techniques for that purpose:
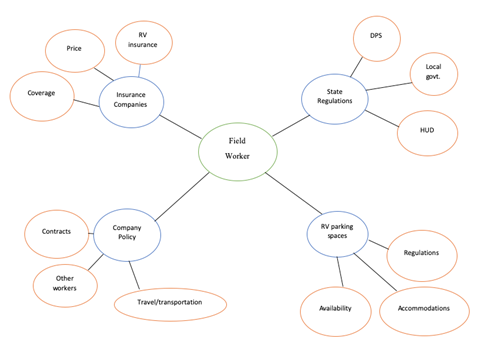
The Stakeholder map allows us to understand key people and institutions we are going to satisfy when designing this Tiny House. First, the people that it would be important to talk to first would be the state regulations because we would have to create a design in accordance to various road, housing, and construction laws. Next, the company policy depending on whether they allow workers to stay on site and sleep or even if they provide arrangements for workers. It is important to understand these stakeholders because there wouldn't be a use in having the tiny house if the state does not allow it and the company does not recommend it. If both the company and the state allow it the next set of people to talk to would be the Insurance companies to determine whether they would cover the tiny house if something were to happen to it. Another place to approach would be the RV (Recreational Vehicles) Park because they would be able to tell you whether they can provide a space for you to park your trailer.
Another method for conducting user research is scenario development. The team created a scenario of a user that captures the essence of the problem opportunity gap that was generated.
To get a feel for how we design the tiny house we planned interviews with previous owners, current owners, places that buy and sell RV trailers. The information that our team will be seeking out of these people is how they feel about their current trailer, their overall experience, what they would about it if they could, an ideal price range for a trailer, the interview would also involve bouncing ideas off them. Due to the ongoing epidemic many of the interviews that were planned ended up getting cancelled due to many places closing their doors and providing only curbside assistance or not even opening to the public at all.
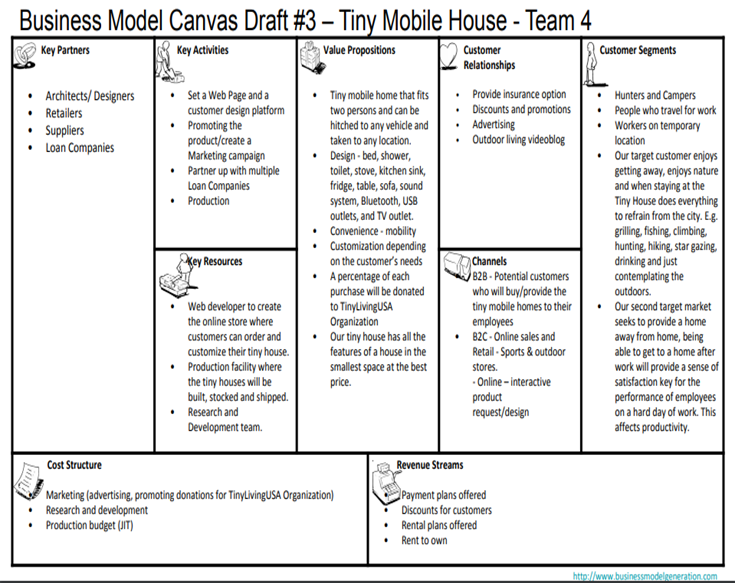
In collaboration with the College of Business at UTRGV, we worked with a team of students from the College of Business to come up with an outline for a business model for the tiny house project. As can be seen this is the third draft, so this business model has been carefully looked over and refined a few times to get to the state that it is now. The key partners to contact and some key activities needed to get the business model off the ground are identified. A value proposition highlights important features that will make this product stand out in the market. The customer is integral to making sure the product is successful which is why a plan for building customer relationships as well as other possible customer segments who could see value in a product like this has a spot on this business model canvas. On the financial side the channels through which deals can be made with distributors to get the product out there are on the canvas. Adding on to that, revenue streams from where the profits will come are outlined as well as the cost structure of this model giving a small outline of where the money will go.
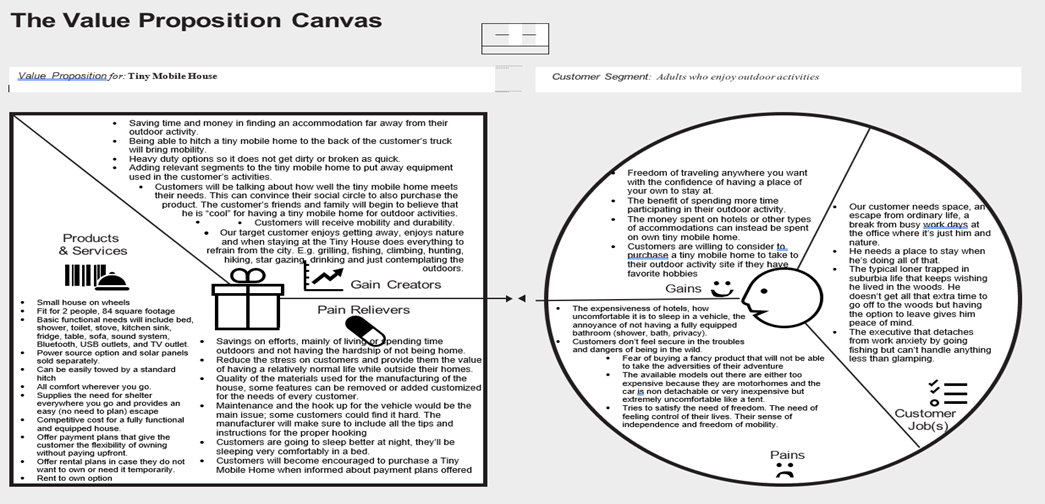
The value proposition is a complex structure that needs to be fleshed out beyond a simple outline presented in the business model canvas which is why it gets another canvas to itself in the value proposition canvas. The value proposition canvas is made up of two components, the chart on the left hand side which is the value proposition itself, and on the right, there is the customer segment of the value proposition. Identified in the value proposition is the products and services highlighting some of the features of the tiny house and services when it comes to ownership such as renting to own, or payment plans so flexibility in not having to pay full cost upfront. The gain creators talks a little bit about the benefits that the consumer would have by owning or possessing a tiny home, and the pain relievers section highlights the issues that this product can solve for its user. On the customer segment side of the value proposition canvas, the gains section explains how the product can cater to their desires, while the pains explains how the product can relieve them of some of the personal reservations that they have. Customer jobs include the type of other consumers who could use a product like this.
Design Spec
The Design Specification captures the “essence” of the design, the following table shows the Design Spec for our project: The table showed the items that had to be put into the house and by deciding whether it was a demand or wish we could sort them out and later determined if it could be integrated into the house or not. This provides a framework that would to design around the needs of our customers and future buyers.
| Design Specifications | ||
|---|---|---|
| Design Requirements | Why? | Demand/Wish |
| The final dimensions for the base of the house are: 15' (L) x 6' (W) x 8' (H) | This are the standard dimensions for a normal double axel utility trailer | Demand |
| The design contemplates the use of solar panels as main source of power with a minimum capacity of 800 W/hr. | We want to make use of alternative energy sources to minimize the impact of carbon footprint | Demand - Wish would be 1 kW |
| The design incorporates 4 main stations: place to sleep, to cook, to eat, and for personal hygiene | These 4 sections cover the main necessities for a comfortable living home | Demand |
| The concept includes a storage for gray water equal to the capacity of clean water | To avoid problems of disposal of the water used | Demand |
| The R-value for insulation must be no less than 12 | An R value of 10 or higher will allow us to maintain an adequate temperature without using excessive power. | Demand - Wish would be R-14 |
| The final concept must contemplate a mechanism to mount/unmount the house onto a trailer | One of the mail characteristics of this house is the ability to move the house and leave it in a place without sacrificing the utility trailer | Demand |
| It incorporates a power backup system using a fuel portable power plant | Since our main source of power will come from the sun, we need a backup source that allow us to continue getting power when there is not enough sunlight | Demand - Wish would be two small turbines |
| The house provides an output AC current 120 V using an inverter | Most of the electronics used work with this type of current | Demand - Wish would be both 120V AC, and 24V DC |
| It includes a portable and compact AC/heater/humidifier to maintain adequate temperature inside the house. | This is a very affordable option to maintain a great temperature for small space areas. | Wish |
| The house includes at least one window for source of natural light into the house. | This will allow the house to use natural light during the day save some power. | Wish |
| The house includes at least 100 gallons of clean water | This is the minimum capacity of water for two people | Demand - Wish would be 120 gal. |
| The house must be on a budget of $15000 | That is reasonable with the lower side of the price market for tiny homes | Wish |
| The house design parameters should follow Texas state regulations | Texas is the state that is more friendly regarding the building of open houses | Demand |
| The house should include a system of foldable bed (Murphy bed) | it is one of the most efficient ways to say space without sacrificing comfort | Wish |
| The kitchen section must include an airborne grease extractor | This will help to keep a safe and clean environment | Wish |
| The kitchen section must have a countertop with storage space under it | it will provide space to cook or prepare food | Demand - Wish is to have a sink top attached to it |
| The weight of the house should not be more than 60% of the total load capacity of the trailer | safety requirements | Demand |
| When the house is not mounted on wheels, it should rest on a footing foundation | State regulations | Demand |
| The house must include a foldable table easy to set | Feasibility | Wish |
| The shower section must include a high efficiency low flow shower head | This will help to save on water utilization | Demand |
| The tiny house must include a fire extinguisher up to code | Safety requirements | Demand |
| The house should include a TV mounted inside with an antenna for free TV signal reception | Entertainment purposes/Information | Wish |
| Weight of the tiny house must be properly distributed at the center and towards the tongue of trailer | This will offer safety when towing the house | Demand |
| The house must include safety features such as reflective tape | This will offer extra safety when the house needs to be towed. | Demand |
Conceptual Design
The objective of the Conceptual Design stage is to take the information obtained in problem formulation and the design specs outlined to come up with possible solutions for the problem. The first part of conceptual design is to define tasks that the product needs to perform in terms of functions and subfunctions and possibly sub-subfunctions. For each of the functions and subfunctions, individual solutions are then explored for each of the functions and subfunctions. The best solutions for each subfunction are then chosen and concepts variants are created using the combinations of solutions. An analysis was done to determine which were the best concept variants based on certain criteria, and from there more rounds of evaluation were done until we arrived at the final concepts.
Functional Design
At first the team decided on functions that corresponded to activities that happened in the house in accordance with a persons’ basic needs i.e., a place to eat, place to sleep, security/safety; however, these first definitions were too vague. After some review, the best way to categorize the functions would in terms of the rooms of a house viewing each function as its own system.
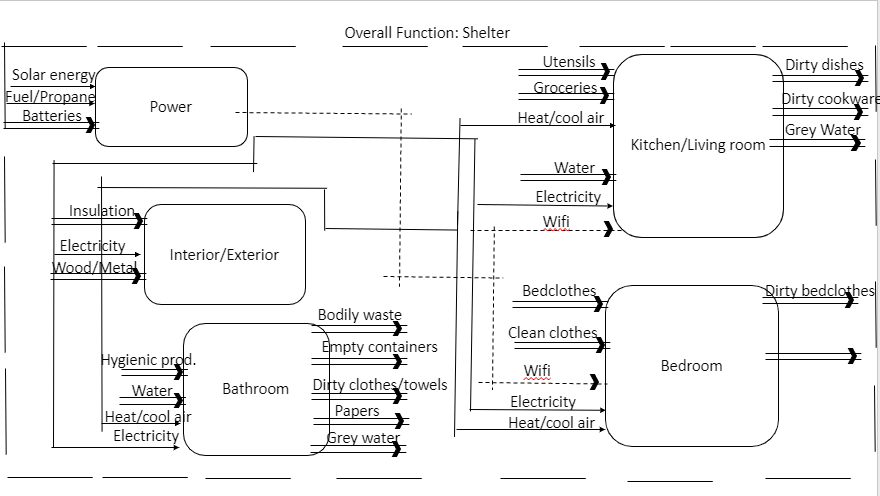
The system was divided into five different functions: kitchen/living room, bathroom, bedroom, interior/exterior, and power. There are inputs and outputs for each of these functions marked by an arrow type with a double line arrow marking materials, a dotted line marking signals, and a solid black line for energy.
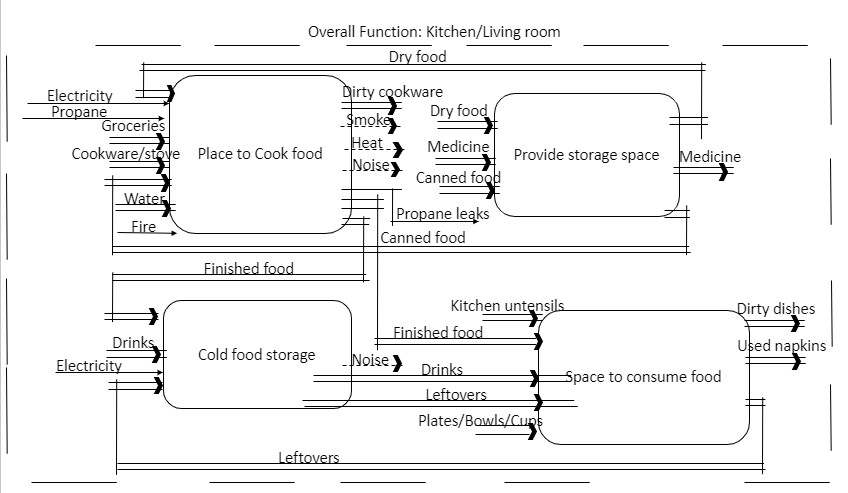
The first subfunction is the kitchen/living room. The kitchen allows for a person to provide the physiological necessities of obtaining food and drink. The kitchen has five subfunctions: a place to cook food, a place to store food, cold storage, and a place to consume food. The place to cook food would take energy inputs such as electrical or gas and fire, material inputs are food items to be cooked; the outputs are heat and smoke, prepared food, dirty cookware. The storage space is meant for items that do not need to be cooled. The materials that go in are dry foods, cans, and possible medicine. The items that go in will also be the outputs of this subfunction. A cold storage is for items that need to have their temperature-maintained to not perish. Inputs for this subfunction include the electrical input to power the storage unit and food or drinks. The items that get put into this cold storage will also be the outputs. A space to consume prepared food is the last subfunction that was brainstormed. Here, prepared food items and utensils and tableware are taken and after the user is done, leftovers and dirty tableware and utensils leave the area.
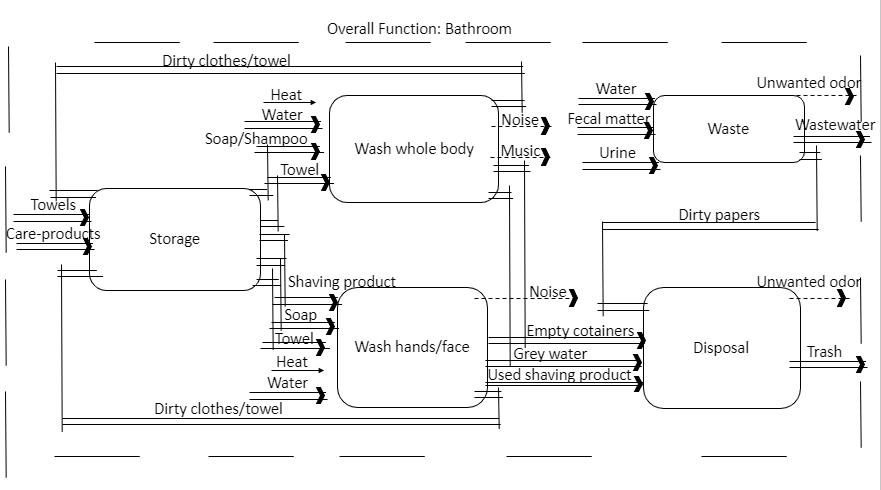
The next subfunction that was defined was the bathroom subfunction. A place to take care of hygienic needs is another necessity. The subfunctions for the bathroom subfunction involve a place to clean oneself which would be a sink and a shower, a place release bodily waste which would be a toilet, a place to store items relating to personal, and a place to dispose of unneeded items. In the bathroom there needs to be a place to store the items that pertain to bathroom so this function was defined. Entering the storage will usually be materials like hygienic products and towels, and at the exit of this subfunction will be various forms of these items to serve one of the other subfunctions. A place to wash the body is necessary especially for an oil field worker who will come home after a long day feeling dirty after working outside all day. The material inputs for this subfunction are hygiene products like soap and shampoo, towels will also go through here, water is another. Energy inputs will be heat. At the exit, the materials will be dirty clothes and towels, possibly the containers for the soap or shampoo if they are empty. Signal outputs are noise, and music. A smaller area to wash is defined for when a full shower isn’t needed. The same inputs for the most will enter the wash hands/face subfunction except for maybe certain products like toothpaste and a toothbrush or shaving product. The same outputs for the wash body subfunction can apply to this subfunction as well. The body its waste so a place to be able to release that waste is needed. The inputs for this are material in the form of water, and the bodily waste. Outputs for this will also be material in the form of wastewater and dirty papers. Signals that exit are unwanted odors. A disposal function needed to be defined to take care of the unwanted materials. The inputs of this are also material in the form of empty containers and hygienic products that are no longer needed, used toilet paper, and grey water. The exit material is trash and a signal is output in the form of unwanted odors.
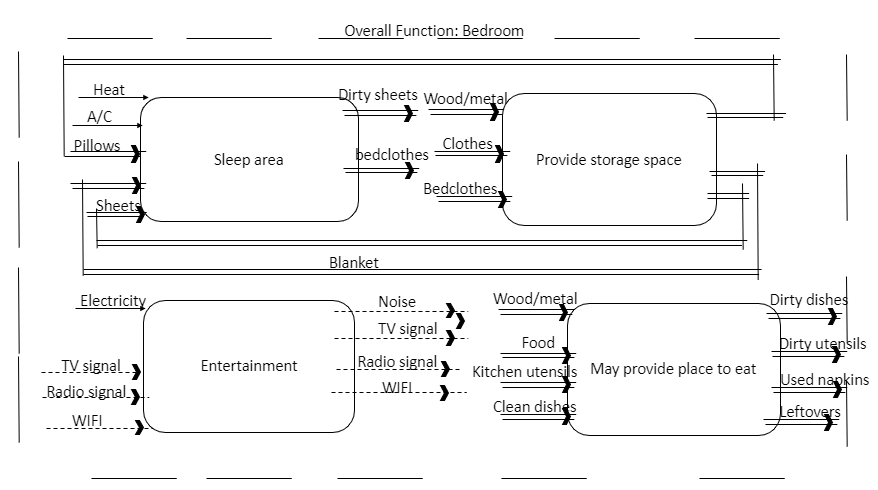
The third subfunction defined was the bedroom subfunction. The subfunctions for this part is the sleep area, storage space, entertainment, and may also provide a place to eat. One of the basic necessities of a human is the need for sleep so a rest are was defined. A sleep area has the material inputs of pillows, sheets, and blankets, the materials that exit are dirty sheets and bedclothes. Energy enters this subfunction in the form of heat and A/C. A place to store the items pertaining to the bedroom are necessary as those are drastically different form the items that need to be stored in the kitchen and the ones that need to be stored in the bathroom, so a separate storage place for this subfunction is needed. The inputs for this are material in the form of wood/metal, clothes, and bedclothes. The exiting material is the clothes and bedclothes. A space for entertainment is necessary because after working for so long it's nice to have some down time and it also satisfies the self-fulfillment aspect of the Hierarchy of Needs. The inputs for this subfunction are mostly signals in the form of TV signal, radio signals, and WIFI signals. The signals exiting is TV signal, radio signal, WIFI, and other types of noise. The only energy that enters this subfunction is electricity. One of the interesting parts of the bedroom is that although it is a separate area, it can still share a subfunction with the kitchen in that it may allow for a space to eat. The materials that enter this subfunction are wood/metal, food, kitchen utensils, and clean dishes. At the exit the materials exiting are dirty dishes, dirty utensils, used napkins, and leftovers.
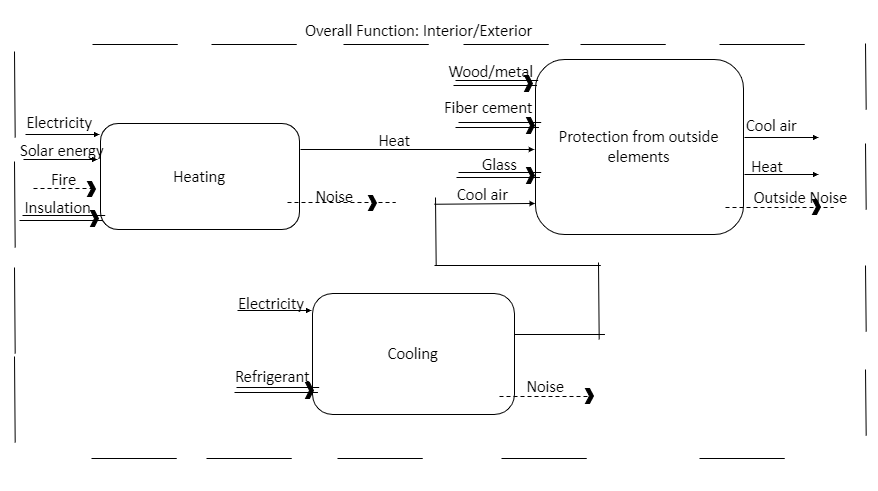
The interior/exterior was the fourth subfunction that is defined in the functional definition. Warmth is a physiological need which is part of the basic needs which can be included in this subfunction by defining heat as a function. Inputs for heat may be electricity and solar energy for the energies, fire may be a signal, and insulation will be a material that enters. At the exit of this subfunction heat is the energy that exits, and noise is the signal that exits. Protection from outside elements is part of the safety needs of a human which is also a basic need which is where this subfunction comes in. There is material that enters this subfunction in the form of wood/metal, fiber cement, and glass. The energy that enters is heat and cool air. At the exit of this subfunction is cool air, and heat. The signals exiting is outside noise. If heat is a need for when it is cold, then it should also be a necessity to have cooling when it is hot. The cooling subfunction has a material input in the form of refrigerant and there is an energy input of electricity. Exiting this subfunction is cool air, and energy and noise, a signal.
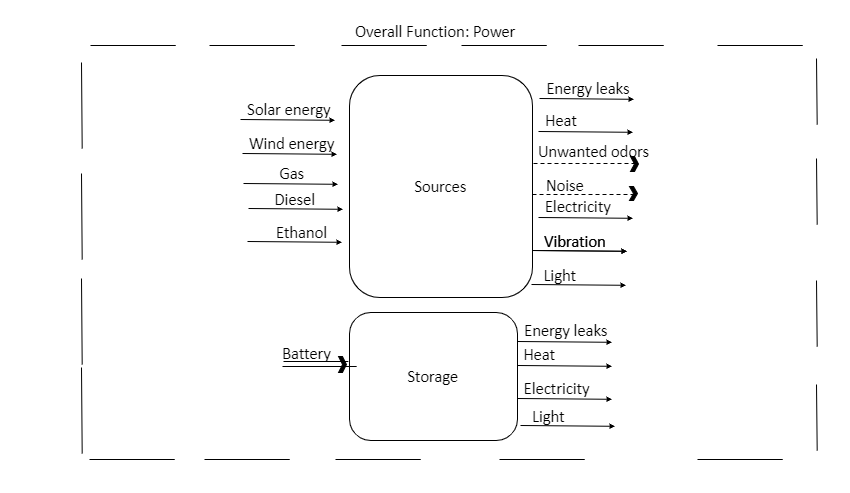
The fifth defined subfunction is power. Nearly every subfunction of the tiny home needs power in order to run at least one of their subfunctions which is why it’s important to define the sources and the storage of power in the tiny house. The source of power subfunction takes in energy inputs in the form of solar energy, wind energy, gas, diesel, and ethanol. The energy that exits are energy leaks, heat, electricity, vibration, and light. There are signal outputs for this subfunction in the form of unwanted odors and noise. The storage subfunction takes a material input in the form of a battery and outputs energy in the form of energy leaks, heat, electricity, and light.
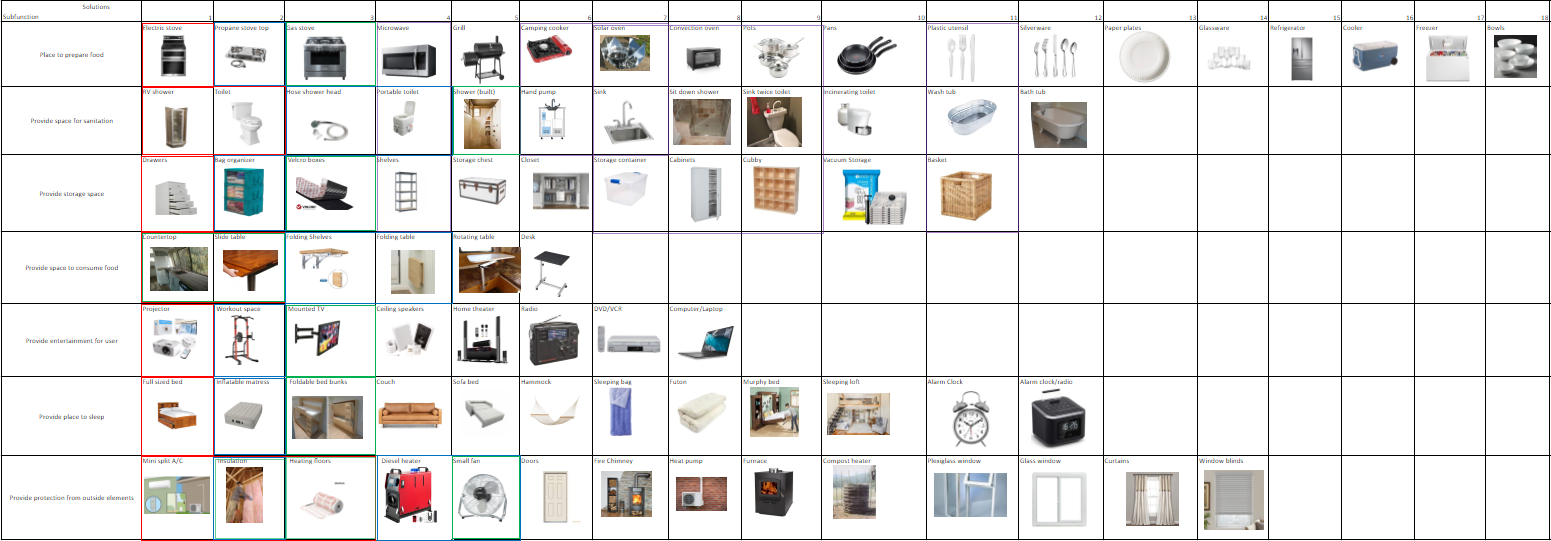
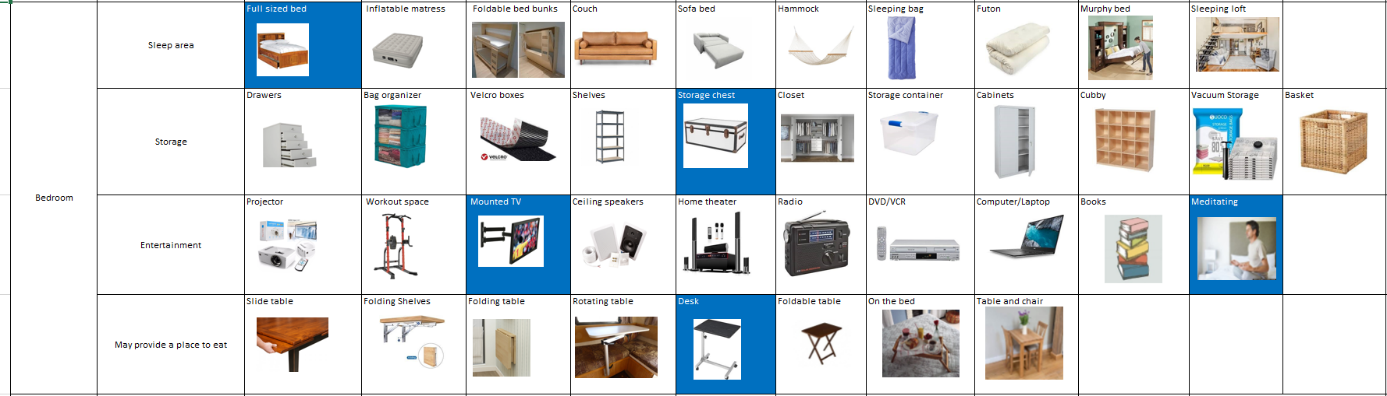
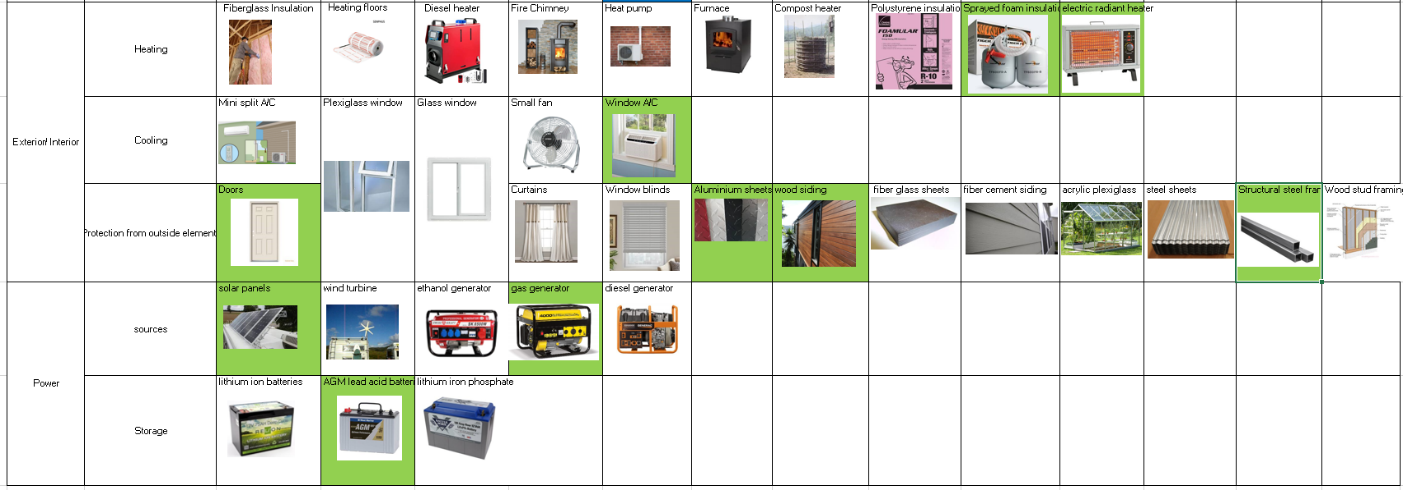
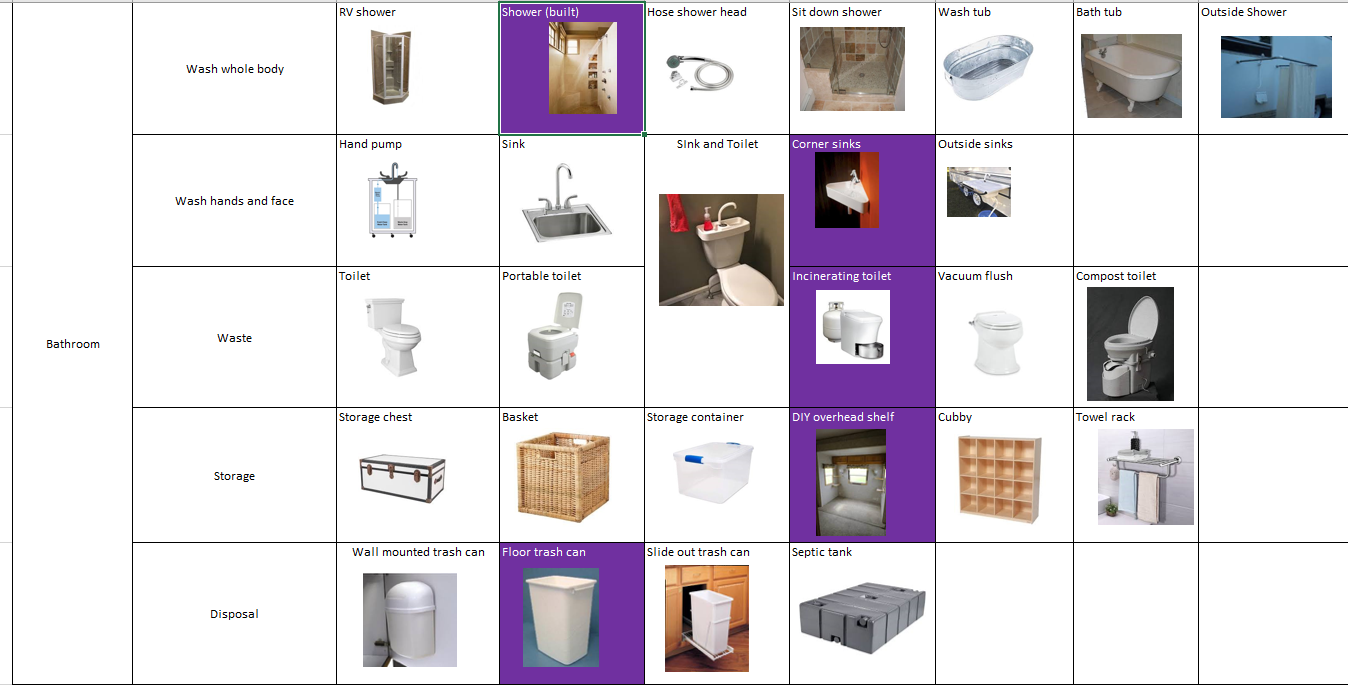
Morphological Chart
The Morphological Chart helps us explore the universe of possible solutions for each function in an orderly fashion. The morphological chart displays the solutions for each need we might encounter in the construction of or tiny house. From the morphological chart, we will then create multiple concept variants characterizing them by price, need, or just comfort.
Concept Variants and Selection Process
Combining all possible solutions would generate a factorial number of concept variants, we had to be selective to find the best ones. As a team we came out with a few elimination processes to be able to come with the better option for our project that will supply the best satisfaction to our client. Due to our project a lot more complex we had to do this elimination process for each of our section of our house which consists of the bathroom, bedroom, kitchen, and the exterior. The three-elimination processes we used was a weighted matrix, a Pugh chart, and each member point rate. We first as team decided to reduce our concept variants to less than 10, this reduction was made by putting ourselves in the client's point of view and deciding the better outcome that will provide the best satisfaction to them. Each team member chose a 2-concept variant they like from each section of the house. The second elimination process we choose was a Pugh chart, the Pugh chart focus more on the satisfaction of the client by putting a weight on the things we believe we should focus our attention more into to.

The things as a team we choose are most important toward the development of our project are display in the Pugh chart above. Then we added a weight to the ones that are more important and due to the majority or our team choose concept variant 1, it is use as a datum to rate the other. At the end we add up the numbers and the final 3 with the highest quantity advance to our final elimination process we conducted. The weighted matrix consists of taing each concept variants accordantly to 5 criteria's the team come up with.
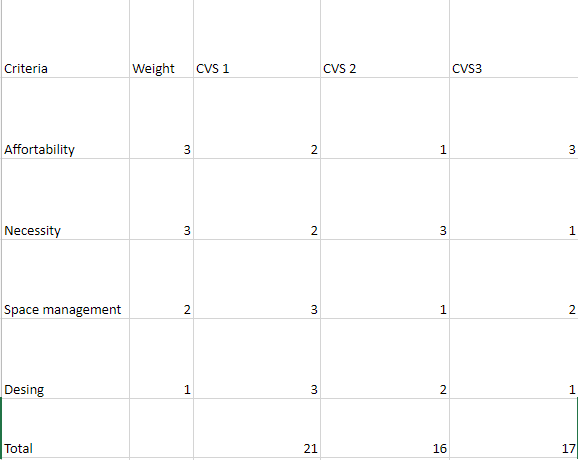
As it could be seen in the representation above the weight matrix shows the five criteria's chosen as a team, and the grade rate each concept variant was given. At the end, the concept variant with the highest number was chosen as our final concept variant for that section of the house. The help us provide our customers the best possible outcome that will provide them all their needs and luxury toward the place they will spend part of their day.
Final Concept(s)
After the selection process we arrived at the Final Concept. The final concept for our project may be a lot different that many of the other team's project, this is due to having to do a final concept for each part of our tiny house. Providing a final concept for each section of our project will help us provide us an easier understanding of what was integrated into our project as well as better explanation to our consumers.
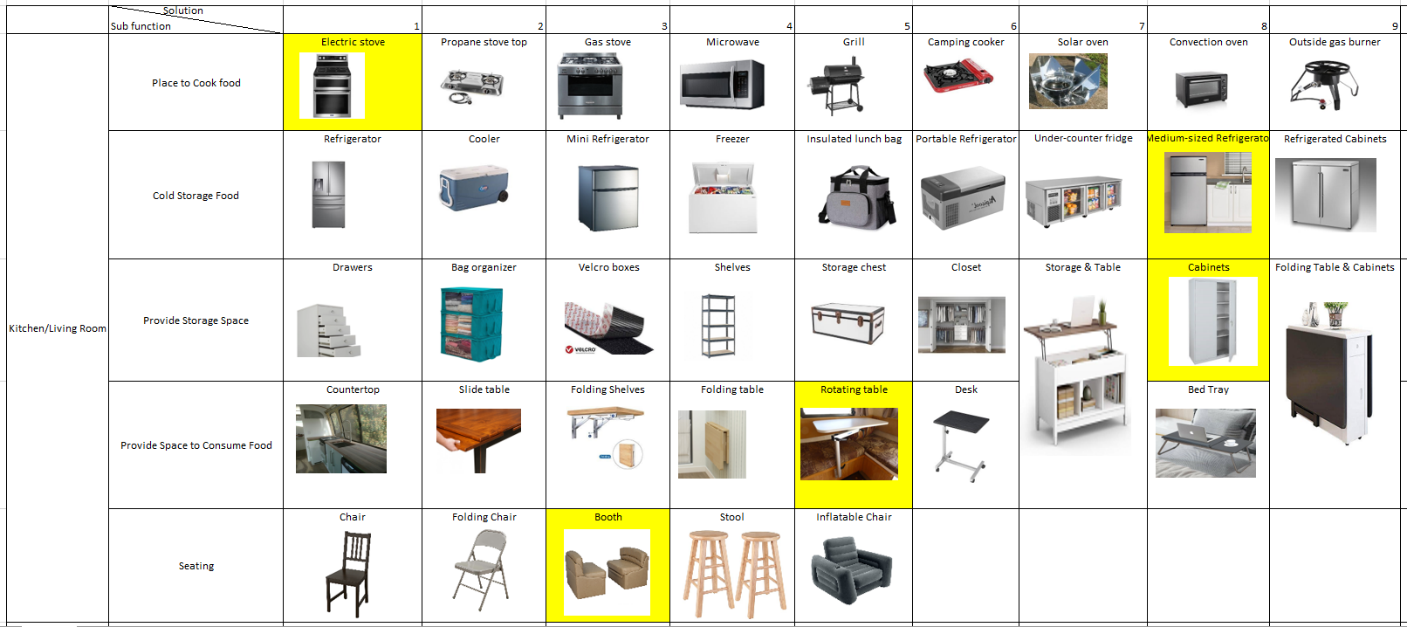
The first Final concept display shows the items that would be intergraded to the kitchen design of our tiny house. The main problem as a team we had to overcome was to be able to provide all the items that will meet with the everyday need of our customers while having to save as much space as possible. The team came up with having a small stove and refrigerator to be able to satisfy the need of store and being able to cook food. For food and culinary storage, we decided to add some cabinets. For eating or resting we decided to had booths and a folded chair to be able to maximize the minimal space we are working with.
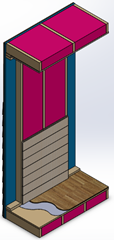
The bedroom final concept was the one we had to really put our minds to it, not only to the minimal space we had, btu also try to satisfy the needs of our future customers the best possible way we can. The best option we can up with to manage the space was adding the murphy bed, which can be able to fold up when not in use and will free up a lot of space for other activities. For storage we added a storage chest and some overhead hangers that will help with the storage of clothes or other items that the customers may need. For entertainment we decided to integrate a plasma tv and a sound system that would provide the distraction for our customers.
The exterior concept variant was the one that took most of the engineering and design of them all. The exterior as compare to the other variants will have to go thru all the weather elements and provides the first line of defense against weather. The team decided to use the best materials out in the market while still trying to stay under the affordable budget we all plan on since the beginning. We used wood studs for the interior of our house and Styrofoam between each gap to help with cold and hot weather conditions. We also integrated pieces of lamina that will supply a second layer of protection, due to many of these workers live in harsh conditions. The goal as a team was to be able to have a good impact in the environment so solar panels were install in the roof and multiple 12v batteries will be used for energy storage. These will help with the consumption of electricity that is generated from fossil fuels and have some of it being generated ecofriendly.
The bathroom final concept variant was the one we had less time putting together, however the one that had to put more thinking into it when it came to space management. That was due to having to integrate a shower, toilet, sink and some cabinets in a small space. The team came up with using a sink toilet that will help with the water consumption by using the wastewater used on the sink for toilet water.
Embodiment Design
The objective of the Embodiment Design stage is where we as a team start from the final solution or concept and begin to design and develop the product with technical and economic criteria. Throughout this process, we collect data and make changes accordingly that will influence our final design. The steps/strategy that were taken throughout the embodiment design process were product architecture also known as the system-level which is how the product is going to operate and what certain steps the product is going to do in order to complete a certain task. Product architecture is vital to any product development because it can/will impact the products' cost, evaluation, and whether it is going to succeed in the market. Next, Design Configuration is where the product is going to be examined dimension wise, color-wise, materials-wise, and the manufacturing processes to design it. Finally, Parametric design where the main objective is to allocate the values to design variables to produce the best possible product design by considering both technical and economical requirements. This section is where we ultimately obtain the best material for our product while minimizing the cost of the product. Overall, the embodiment design process involves multiple engineering tools such as engineering calculations, engineering techniques such as materials selection, software utilization, prototyping, testing, result analysis, and evaluation. Throughout this process we as a team would constantly go back to our design specifications to further evaluate them.
Strategies and Priorities
Starting from our final concept, we identified the necessary analysis and engineering work to visualize the final concept into a final product. The main priority of the tiny house project was to incorporate engineering analysis/calculations. We as a team included a scale build of the tiny house, we also included calculations that would determine the amount of energy that the tiny house would be using, determined external forces on the tiny house, water usage, energy balance and ultimately modeling the tiny house.
A strategy that was used mostly by our team was to divide and conquer the work and then often check on each other and combine our work.
Overview of the building materials:
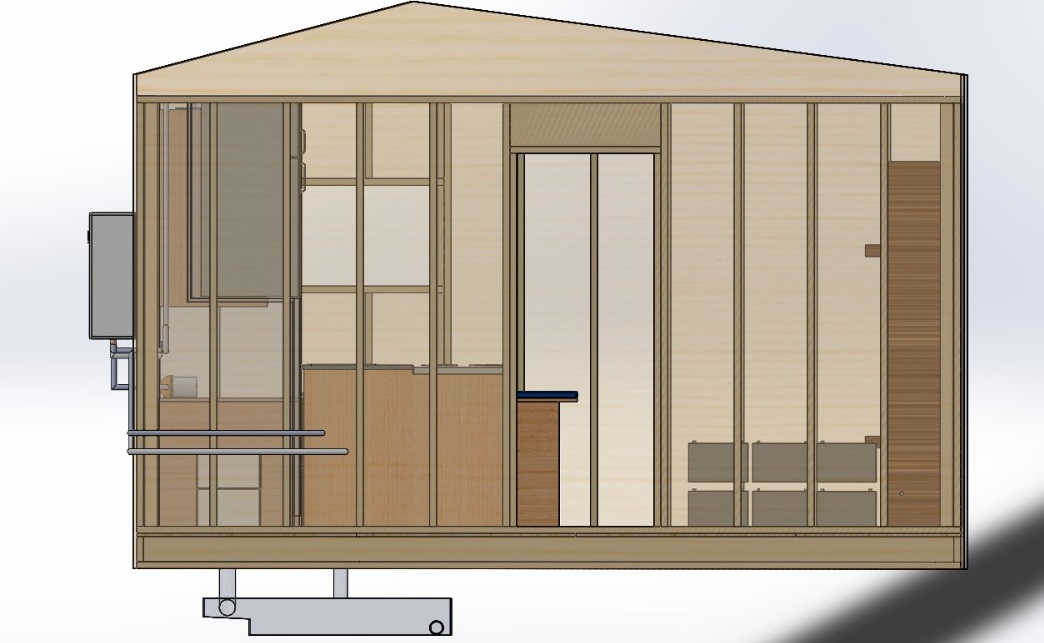
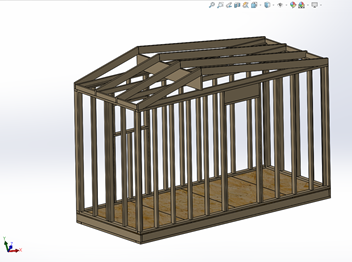
The selection of the materials to build the tiny house was based on the availability, sustainability, and the feasibility of the product. We decided to use wood as the main material for construction of the framing structure as well as the finishing interior and exterior. For the sidewalls we used 2x4 studs made from Douglas – Fir wood and for the ceiling joists and roof rafters as well as the floor joists we decided to use 2x6 studs that provided almost double the strength of 2x4s and capable of resisting wind loads. This framing structure is complemented with metal ties that keep the roof, ceiling, sidewalls, and floor base all together. To insulate the cavities between the studs we used fiberglass insulation, and we added EPS board insulation to increase the overall value of the tiny house and to provide a more air-tight construction that would be able to keep an adequate temperature all the time. The floor construction includes a subfloor plywood of 7/8 in. With a vapor barrier layer and finished with hardwood floor panels. The interior of the sidewalls is finished with 3/4 in. wood panels and the exterior with the EPS board insulation glued to a 1/2 in. OSB sheathing layer. It is finished with engineered wood treated to resist termites and fungal decay. The roof has a 1/2 in. layer of OSB sheathing with a vapor barrier and finished with asphalt shingles.
Water System:
In this section we will explain the requirements and selection of the components of the water system in the tiny house as well as provide a general design for how it will work.
After doing research reguarding water consumption habits, we as a team came up with the following requirements for a water system.
Requirements:
- Heater and plumbing
- Fresh water system
- Tank of 100 gal. fresh water
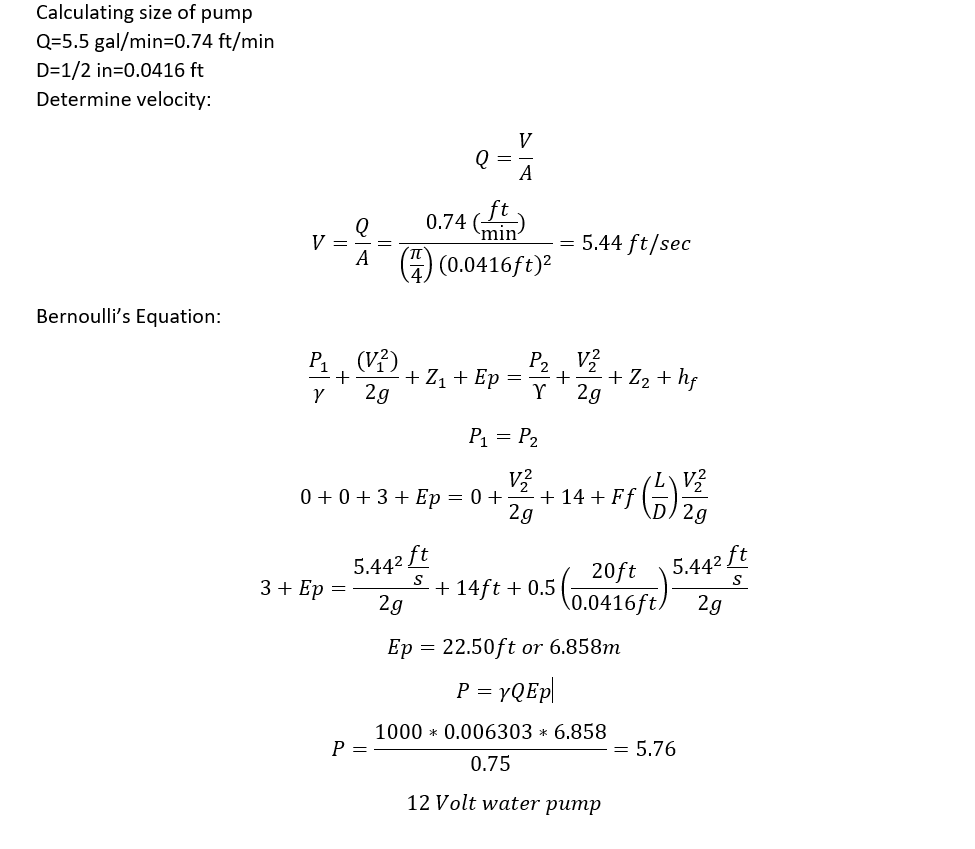
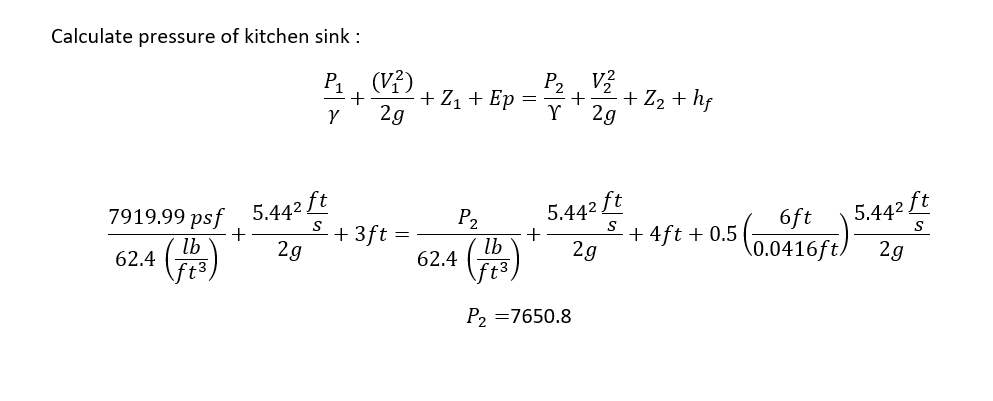
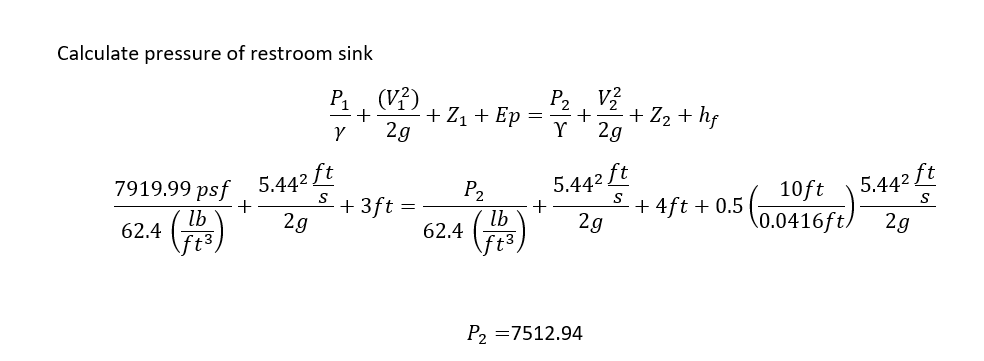
- Water pump 5.5 gal/min at 55 psi
- Piping system PVC 1/2"
- Tankless water heater
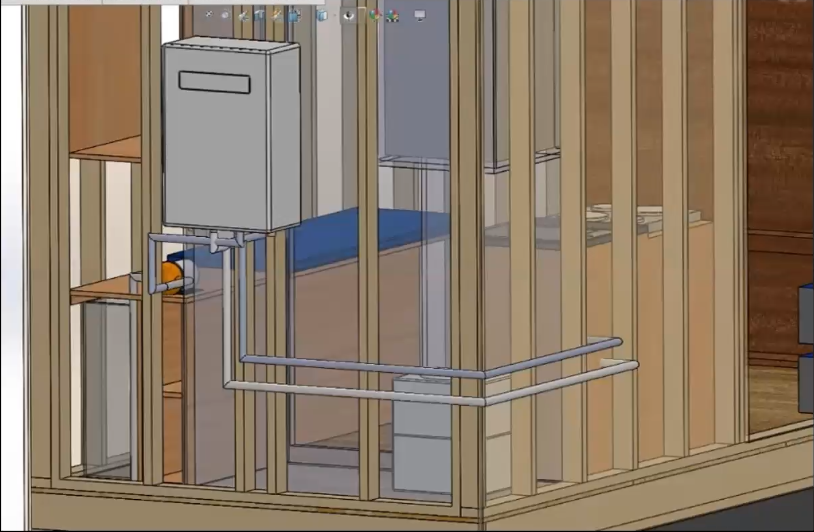
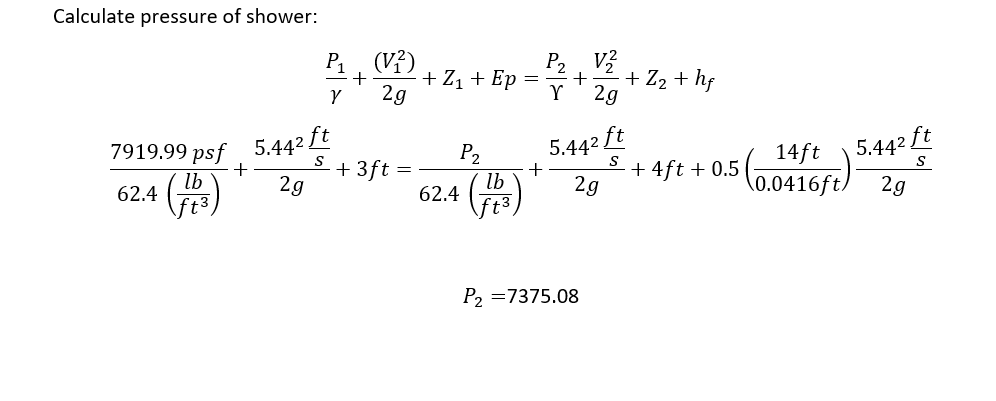
Access to fresh water is a neccessity for the wellbeing of the consumer. Ideally the tiny house will be using city water, however if that isn't available, a tank will provide reserve water. Taking into account the available tank sizes as well as the weight and space limitations, a 100 gallon tank was selected for water storage. A 100 gallon tank will be sufficient enough to carry enough water to last a few days. A water pump is needed to transfer water from the tank throughout the system. Calculations shown below show that a 5.5 gal/min pump is needed to deliver water. The 1/2" PVC pipe will allow for increased pressure delivered the water outler. A tankless water is added to allow for hot water access.
Pump sizing calculations:
Grey water system:
A grey water tank is included in the design of the water system to hold waste water so it can be disposed of later. Below are specifications of the grey water system.
- Tank 32-45 gallon capacity
- Hose connection to drain
- Shower and sink collector
Electrical System
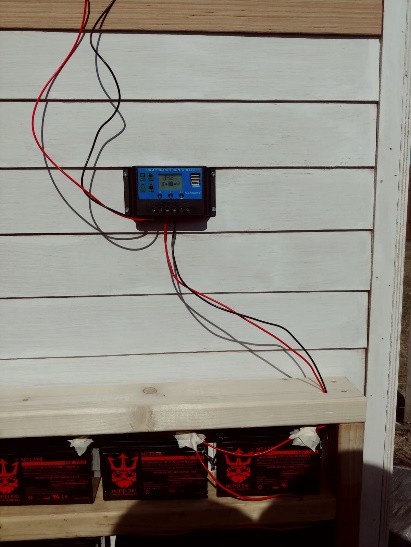
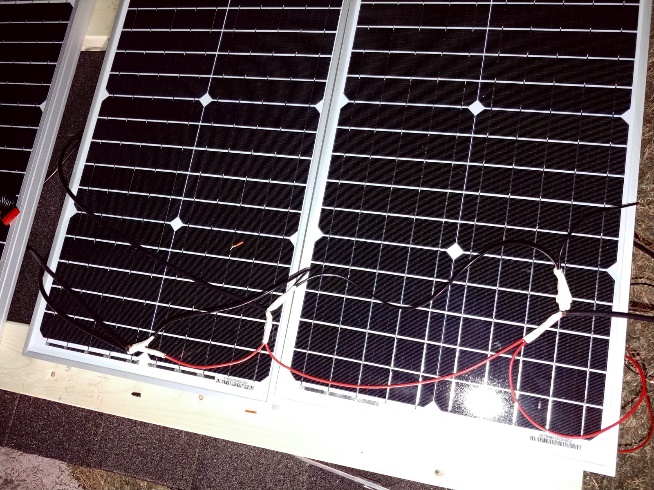
To calculate and determine whether our solar panels would be a great asset to our electrical system. First, we decided to connect small devices to our solar panel to get an understanding of the amount of power that the solar panels would supply. Later, once we allowed the solar panels to charge the batteries for a while, we decided to connect a phone charger to test whether the phone would actually charge, of course it did. Finally, once we got an understanding of how the solar panels would supply power to house, we then decided to test higher electrical consumption devices, such as a stereo, charging a laptop, etc... Once finished we then had an estimate of how much power we will need to full supply electricity to our tiny house.
Power system for the tiny house:
The calculation of the total power needed for the tiny house is directly going to depend from all the elements that function with electricity. Since we are trying to develop a system that could work off the grid, meaning a self-sufficient system that does not have to use power coming from a utility company, we need to take into account every element that utilizes works with electricity whether it is DC or AC.
Below there is a list of the appliances that were taken into account as a good estimate of the total electro domestics the tiny house might include along with the hours each appliance is expected to be in use, the amount of power, in kWh, these consume per hour, and the total amount of power that is expected to be consumed throughout one day.
| Appliance | Hours used/day | Power used/hour (kWh) | kWh used per day |
| Small Fridge | 24 | 0.03 | 0.69 |
| Microwave | 1 | 0.7 | 0.7 |
| LED lights | 5 | 0.02 | 0.1 |
| TV (43", 4k, LED) | 5 | 0.07 | 0.35 |
| A/C unit | 4 | 0.07 | 2.8 |
| DC water pump | 2 | 0.05 | 1 |
The total amount of power that is expected to be consumed is 4.74 kWh/day. This means, we will have to produce and storage a capacity equal or higher than the total power that is going to be consumed. Since we determined that we were going to use solar panels as our main source of power, we need to know how many solar panels and of what capacity we are going to require in order to supply de demanded power. Out in the market there is a myriad of possibilities from where to choose, but we need to be careful at the time of picking the appropriate solar panel system that is going to provide the necessary power for the tiny house. In this sense we need to consider the types of solar panel, the overall capacity, and something really important, the square footage these panels are going to occupy since we do not have an infinite amount of space where to place them. After doing some research and considering all these constraints, we found out that the best types of solar panel are the monocrystalline since offer greater efficiency of power production per square footage. We also found out capacities of production over 300W/h per panel which could be really helpful in terms of minimizing the number of solar panels installed without compromising the power production. Having all these factors into account, we determined the number of panels necessary to be between 3 and 4 panels which correspond with the amount of square footage that we have available to use for the installation. The power produced by the solar panels are going to be between 900 to 1200 W per hour, which should be enough power supply for the loads. Following with the power system for the tiny house, it is also going to be necessary a device that controls the amount of power collected from the solar panels and that is going to be storage. This device has to meet or exceed the total capacity of power that is produced by the solar panels. Depending on the arrangements we make for the solar panels, whether if it is a 12V or 24V system, the solar charger should be able to provide the necessary voltage to charge the battery system. This leads us to our next step for the power system, the storage capacity. Depending on how much of the budget is going to be destinated to the power system, we can use a variety of batteries, whether if it is lithium or lead acid batteries. For the long run, we believe that lithium batteries are the solution, specially if we do not want to be dealing with maintenance on the batteries. Of course, this means that we are going to invest a greater amount of money at the beginning but on the long term it is going to pay itself for the benefits obtained compared to other types of batteries in terms of capacity and performance.
Independently of the type of battery we use, the storage capacity has to be matched. Based on the calculations for the power needed to run the tiny house appliances and other electric components, it was determined that we should have a capacity of at least 4.8 kWs for each day operations. For example, if we use lithium batteries (LiFePO4), the maximum capacity it has is 12V and 100Ah, which means it has a power of 1.2kWs (12V x 100Ah). Since we require 4.8kWs daily, we are going to need 4 batteries with this capacity.
One of the constraints we determined in the design specification stage was that the tiny house had to be able to provide with AC sources of electricity in order to use the majority of the appliances which work with this type of current. Since the current produced and storage is DC, we are going to need an inverter that converts DC to AC output, more specifically 120V AC. If we make a detailed checking on the appliances that need the most power we can quickly determine these appliances are the microwave and the A/C unit. For the rest of the components that run with electricity, a small to medium size inverter will be more than enough (≈ 2000 W peak) but if we would have to run all the appliances at the same time, including the A/C unit and microwave we will probably going to need a far bigger inverter. This can be traduced in a greater amount of money spent just to provide for the starting of these appliances. Instead of getting a bigger inverter, we could use a soft starter or “easy start” that will allow us to star up these big appliances and preventing power shortage.
Lastly, as we do not want to rely hundred percent on the solar power capacity, we are going to install a portable generator that can serve as a back up in case we face a cloudy day or for some reason we are not obtaining the required amount of power from the solar panel system. This generator will work using either propane gas of fuel like gasoline.
HVAC Calculations
One of the top priorities of this project was to design a tiny home that the consumer can feel comfortable living in for extended periods of time. An aspect of this is designing the tiny home so that it will adequately provide heating and cooling needs. To achieve this, we must size an appropriate A/C unit; this requires calculating a thermal resistance of the structure and performing load calculations.
Below is a table which lists the materials used in the construction of the house along with their R-value.
| Material | R-value (hr-ft^2-F/Btu) |
| LP smart siding | 0.6 |
| 1/2" OSB siding w/1" of EPS | 10 |
| 2 x 4 wood studs | 3.5 |
| Fiberglass insulation (R13) | 13 |
| Fiberglass insulation (R19) | 19 |
| 3/4" pine wood paneling | 0.75 |
| 2' x 2.5' window | 2.75 |
| Door | 5.263 |
| Flooring | 1 |
The outside and inside air conditions contribute to the thermal resistivity of the system. Below are the R-values for the outside and inside air conditions. The outside air was assumed to be moving air, any direction, horizontal heat flow, at 15 mph with the temperature at 100 degrees Farenheit. The inside air the conditions are still air in the vertical position, heat flow horizontal, and the temperature was assumed to be 75 degrees Farenheit.
| Condition | R-value (hr-ft^2-F/Btu) |
| Outside surface air | 0.17 |
| Inside surface air | 0.68 |
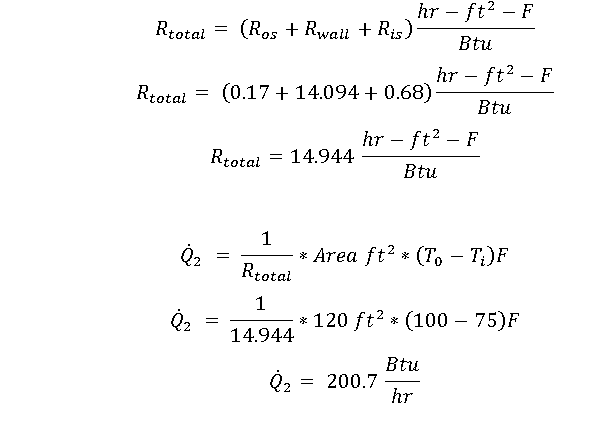
Long wall with window circuit:
The long walls of the tiny house are 8 ft high and have a width 15 ft. On one of them there is a single window that that is 2 feet high by 2.5 feet wide. The wooden studs in the frame are spaced 16 inches on center, we assume that the insulation - studs percentage in relation to the area of the wall is 80/20%.
| Section | Area ft^2 |
| Long wall area | 120 |
| Window | 5 |
| Wall minus window area | 115 |
| Stud area | 23 |
| Insulation area | 92 |
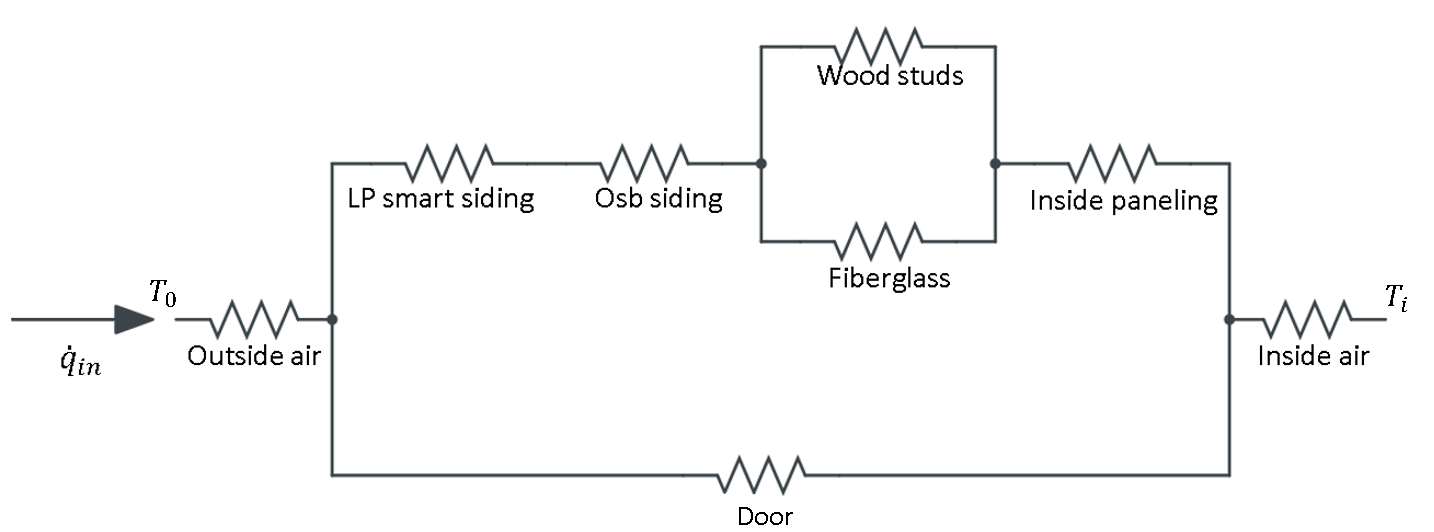
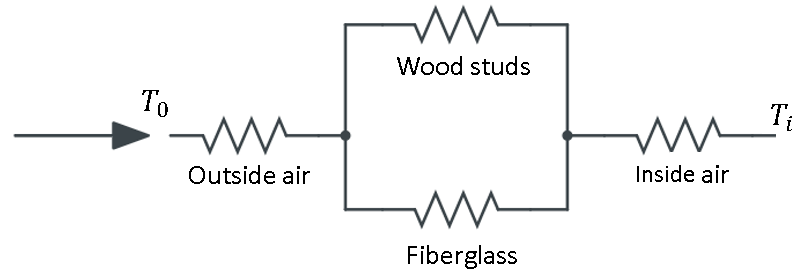
Heat transfer through a composite wall can be modeled as a thermal circuit, blow is the circuit for the long wall with the window in it. The materials which make up the wall act in series with the exception being the wood studs and insulation which are parallel to each other, the window is in parallel with the entire wall, and the outside and inside air are in series with the wall.
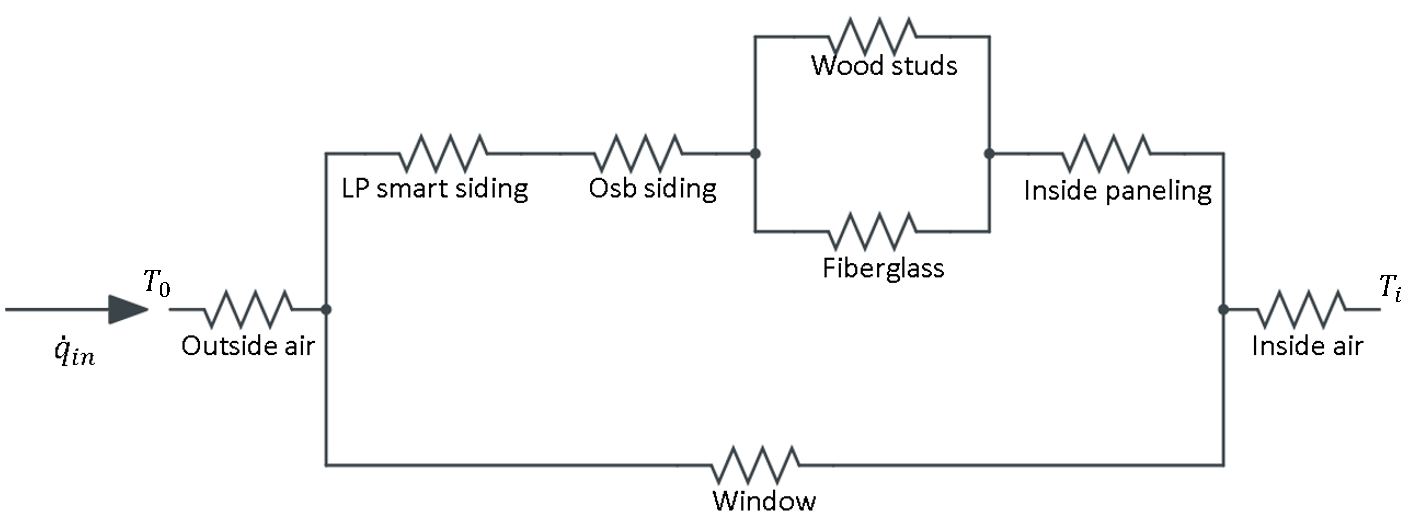
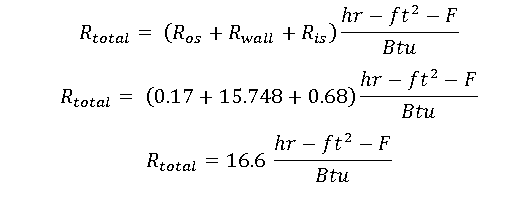
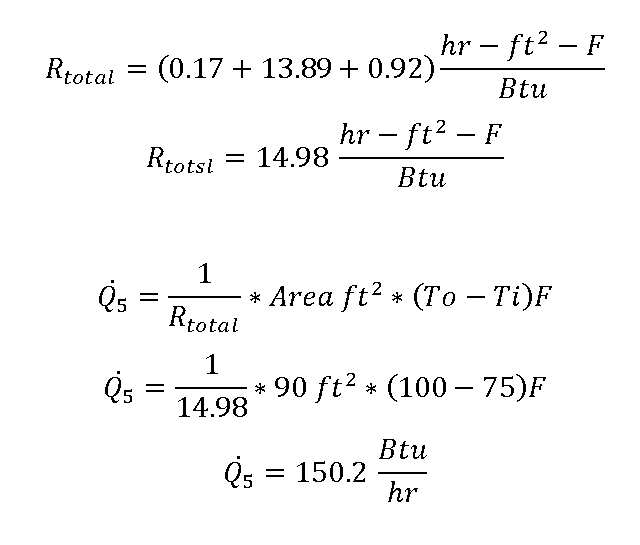
The first thing to do is to reduce the studs and insulation to an equvalent resistance which will be referred to as R_frame.
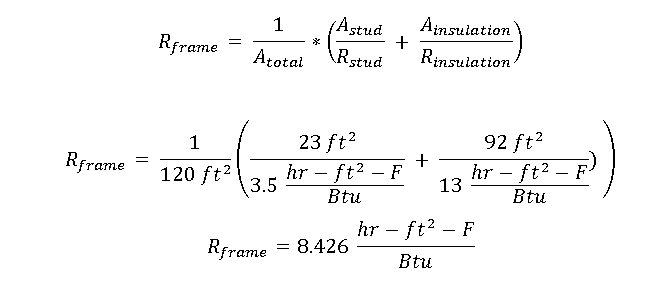

The window is still in parallel to the other building materials, so another equivalent resistance will be calculated.


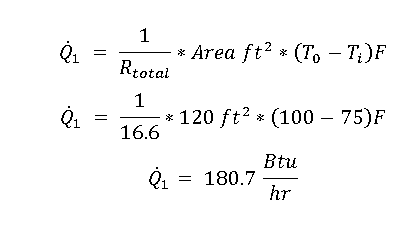
The circuit has been reduced to an equivalent circuit, the next part of the analysis is for overall reistance of the system can be calculated.
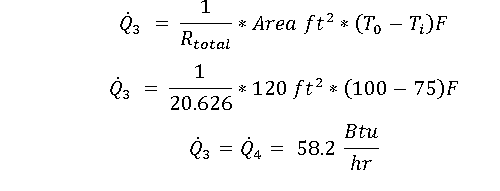
With the equivalent resistance calculated, we can now calcualte the heat transfer through this section of wall.
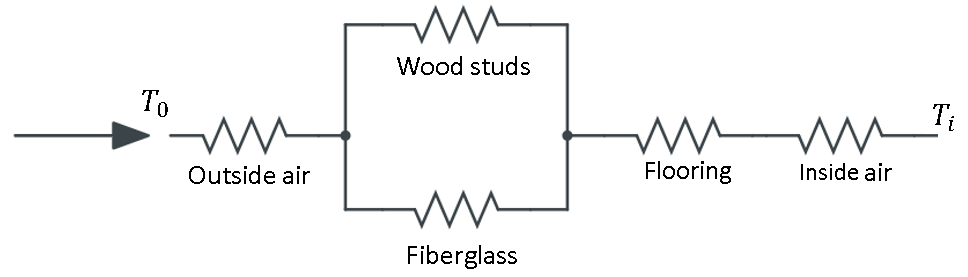
The same procedure for analyzing the thermal circuits will be used for the other wall sections, the floor, and ceiling of the tiny house.
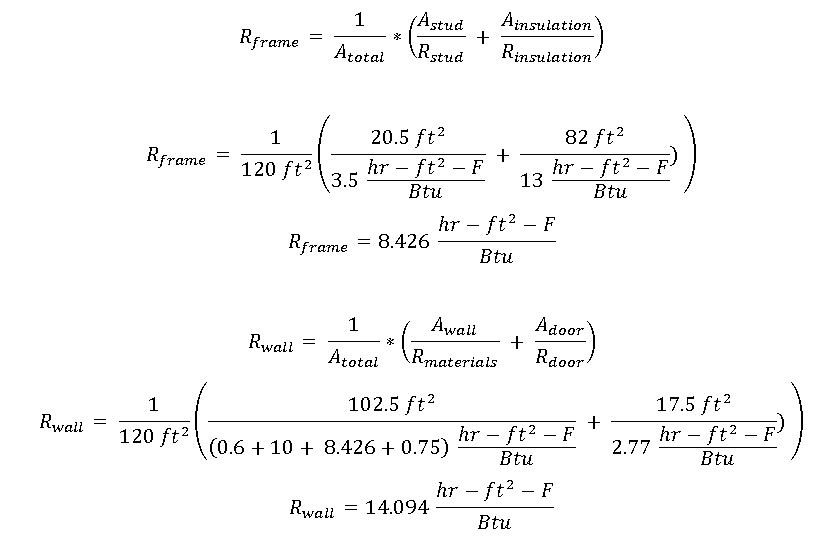
Long wall with door circuit:
The dimensions of the wall are the same as the previous section of wall, 120 square feet. Overall the thermal circuit for this section of wall should the same as the previous one, the difference is that there is a door instead of a window. The door is 7 feet high and 2.5 feet wide. For the frame the same percentage for evaluating the area of the studs and insulation will be used.
| Section | Area (ft^2) |
| Wall area | 120 |
| Door area | 17.5 |
| Wall minus door | 102.5 |
| Stud area | 20.5 |
| Insulation area | 82 |
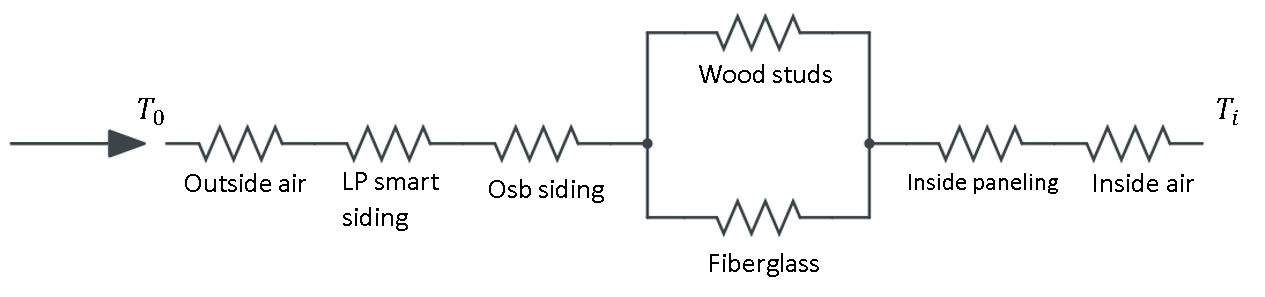
Short walls:
The short wall sections are 8 feet high by 6 feet and have the same composition as the long walls, the two short walls are exactly the same so the calculations in this part will apply to both.
| Section | Area (ft^2) |
| Short wall | 48 |
| Stud area | 9.6 |
| Insulation area | 38.4 |
The conditions for the outside air will remain the same for the calculation of the floor and ceiling as the ones used for the walls: moving air in any direction 15 mph. The inside air is horizontally positioned still air, however the direction of heat flow differs. Heat flows upward into the tiny house through the floor, and the heat flows downward into the tiny house through the roof.
| Condition | R-value (hr-ft^2-F/Btu) |
| Outside surface air | 0.17 |
| Inside surface air (ceiling) | 0.92 |
| Inside surface air (floor) | 0.61 |
First, there are some things to note about the construction for the ceiling and floor and how they differ from that of the wall.
- The insulation used in the floor and ceiling is R-19 fiberglass as opposed to the R-13 fiberglass used in the walls.
- The studs in the ceiling are spaced 24 inches on center which changes our assumption for the wooden stud - insulation percentages from 20%/80% to 15%/85%.
Ceiling:
The ceiling has dimensions of 6 ft by 15 ft. As mentioned before, we assumed that the percentage of wood studs in the ceiling frame to be 15% of the area, and the insulation to be 85% of the area.
| Section | Area (ft^2) |
| Total area | 90 |
| Area of wood studs | 13.5 |
| Area of insualtion | 76.5 |
Floor:
The floor an area of 90 ft^2 similar to the ceiling. The 80/20% assumption for the insulation and studs were used to determine the area of the floor frame.
| Section | Area (ft^2) |
| Total area | 90 |
| Area of wood studs | 18 |
| Area of insualtion | 72 |
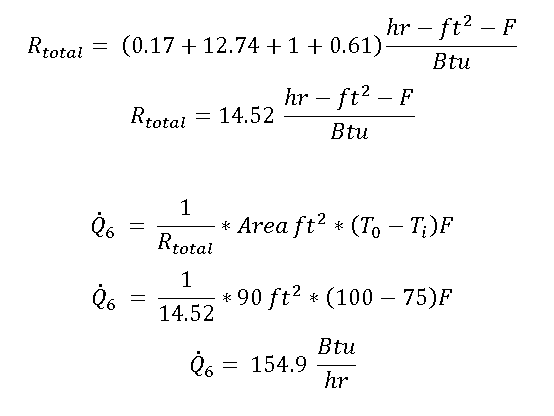
The total heat transfer through the tiny house can be calculated by summing the values for heat transfer that were obtained.
Software calculations:
It is important to know that these hand calculations do not take into account the variations such as appliances that are on, people in the building. These calculations also do not take into account the variance in weather conditions. The use of software can help aid in closing the gaps by taking into account the variances listed and more.
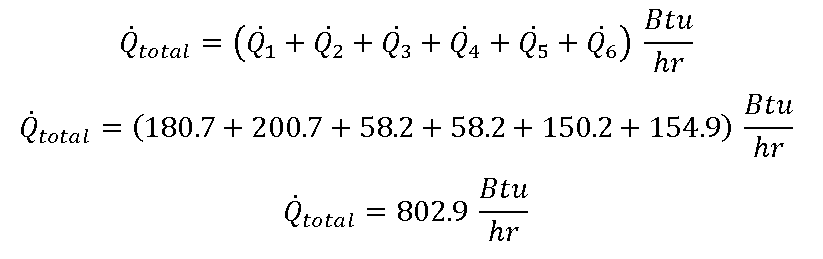
The image above shows some results from a model of the tiny house set up in Wrightsuite Universal, an HVAC program which which calculates the heating and cooling loads that our hand calculations did not take into account. As can be seen those factors significantly impact the heating, going from 802.9 Btu/hr to 4713 Btu/hr. The size of A/C unit that would be appropriate for the heating/cooling needs of the tiny house is a 0.6 ton unit.
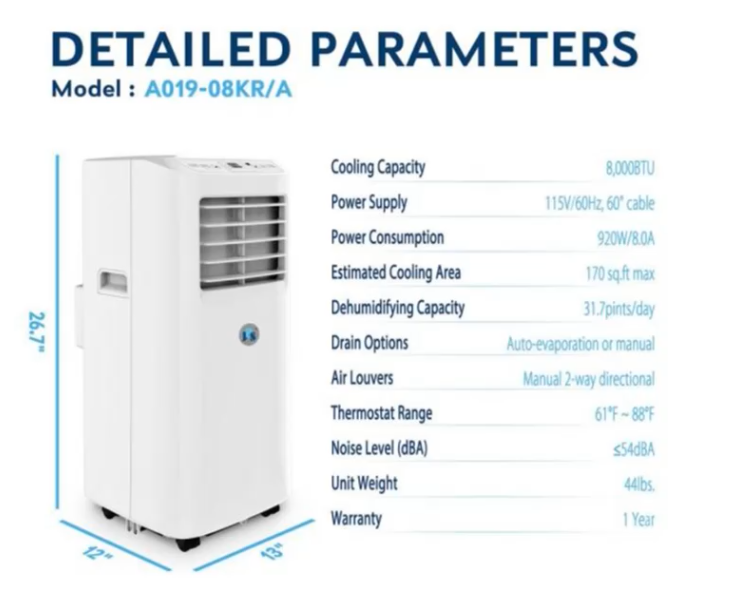
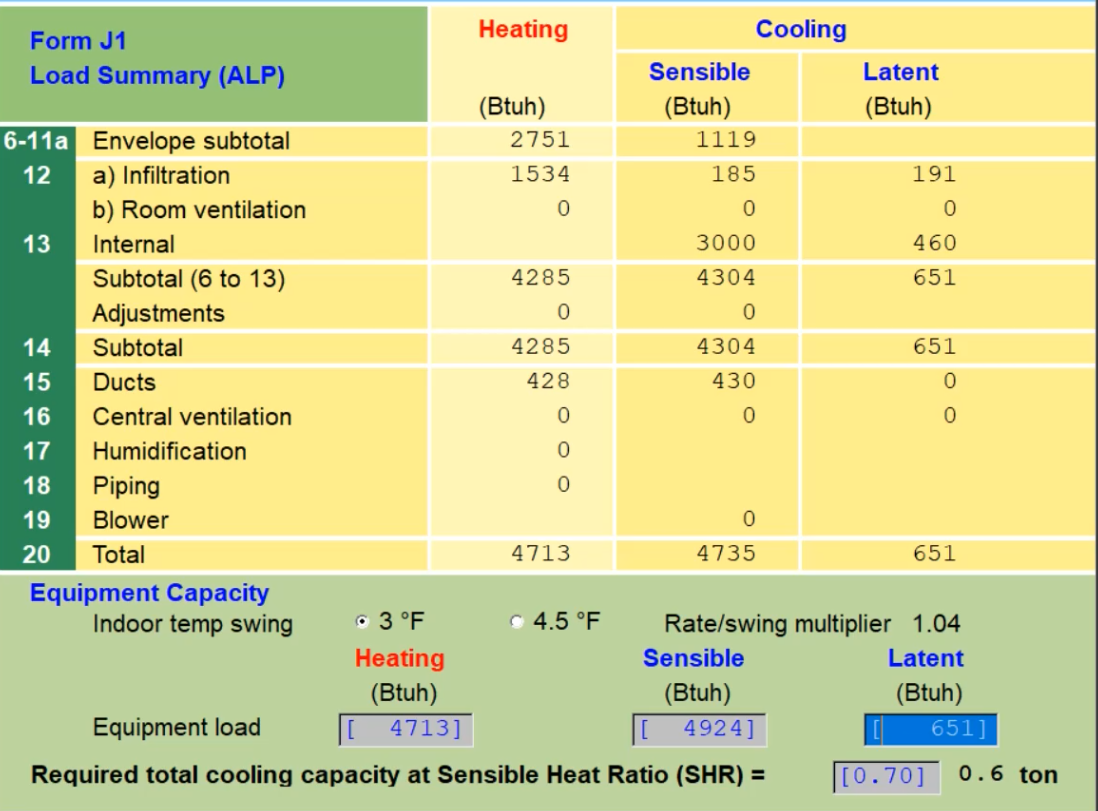
As a team we recommend a portable A/C unit such as the one above. It satisfies the size requirements and the advantage of this unit is that it is compact and as a result won't take up alot of space in the tiny home; also, because this unit is ductless, we don't have to size ducts giving more headroom for the owner as well as cutting down on the overall weight of the building.
Test 2: Finite Element Analysis (principal stresses and displacements)
When determining which components of the Tiny House to study for different analysis including deformation and how the overall membrane of the house will react, we as a group decided that the overall frame of the house which includes the base, the walls and the roof were all important for this study. Below is the initial assembly that was created by combining the base, structural walls and the roof with the inclusion of our initial mesh.
For our initial mesh we used a bigger element size at 5 in. with an initial total number of elements at 28,194. As our group moves forward, we plan to add more elements and reach a convergence that will better represent the study we plan to calculate and simulate with boundary conditions to be placed at the bottom of the tiny house. Deformation of the membrane and how different wind forces acting on the roof while the tiny house is in transit will be observed upon in this study. Below the figure of our initial mesh and table showing our parameters for this mesh are seen below.
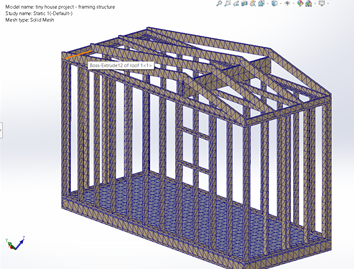
| Initial Mesh | |
| Number of Elements | 28,194 |
| Element size | 5 in |
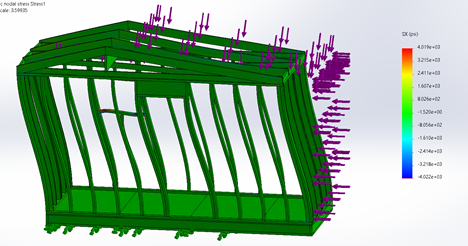
Below is a figure that highlights how the inner membrane of the tiny house will react with no support when it is subjected to 25 mph winds. In this study, the boundary conditions are underneath the tiny house and serves as an example of when the tiny house is in a stationary position. Stresses in the x-direction are simulated and studied below.
Test 3: Final Test
Our final test included our team fully charging the batteries with our solar panels connected and allowing them to fully charge the batteries and once finished we were going to connect a set of LED lights to the batteries and allows them to drain the battery. This test allowed us to understand a time frame on how long the batteries would last. This time frame being around 50-100hrs because LED light draw a small amount of current and only use a fractional amount of watts compared to a regular lightbulb.
Testing and Validation
The objective of the Testing and Validation stage is to make sure our tiny house can withstand and complete daily task that it is going to have to perform on the daily basis. This step of our tiny house includes a testing plan where we will put our house through certain parameters, obviously taking the safety and social distancing into account, to analysis the maximum ability of our house. Later, based on our results we analyzed and made changes accordingly to our product.
Test 1: Electrical System
Test 2: Water System
Testing our water system consisted of many different stages and depending on whether it would pass the first stage it would often change what would happen in the next. So, first we decided to glue and install all our plumbing pipes and fittings to check for leaking or any inconsistencies in the installation. Next, we did a small life simulation if someone were to be living in the tiny house and using all the water essentials provided. Next, we decided to connect our water pump that was going to be providing water to all our outlets which were going to be the shower and two sinks. Finally, we check on whether drainage system was going to work with our design, which worked, and doing so we were checking for leaks and any inconsistencies in the pipe installation.
Test 3: Final Test
The final test was to test the water system on its full display having the water run through each water outlet and then having it flow into the waste tanks. This test was the one that would certify that our system was design correctly and that it had no flaws in it. It was also used to determine how long the water on our tank lasted and how much water was being save when comparing both tanks.
Return home
This page highlighted some of the details of the design process we used to turn our ideas and how we refined them to arrive to the the final design. Click on the header above or on the sidebar to return to the senior design home page.